Jump To:
Overview
About
Online Map
List of Available Free Online Map Sources
Backup
Restore
Touch Screen Mode
Hibernate Mode
Hard Button
How to use screen recording
Screen Lock Configuration
Display
Sound notification
Active Licences
Add Licences
Software Update
Language
Overview
iCON site / iCON site Plus +
When working with the 'Classic Home screen', the settings for System, Units, Devices and Clouds are available from the lower part of the classic home screen.
See also: Overview on Home screen/Admin Panel

☞ From within the map view of any application tap the Home key to be returned to the Home screen.![]()
iCON build / iCON build Plus +
When working with the 'Admin Panel', the settings for System and Units are available from within the Admin Panel.
See also: Overview on Home screen/Admin Panel
Tap Settings to open the Settings page. 

On the Settings page you can find System as well as Units & Tolerances settings.
☞ To return to the Appplication Map view tap the Back button in the upper left corner.
☞ Settings for Devices are available from within Status Bar 1.
See also: Status bar TPS/Status bar GNSS

☞ Settings for Clouds are available from withinStatus Bar 2.
See also: Status bar TPS/Status bar GNSS

About
- To retrieve system information, go to Settings > System from within the Home screen/Admin Panel.

- Select About
- Information on Software and Hardware is displayed:
- Software Version and Build installed
- Copyright information
The iCON software contains copyright-protected software that is licensed under various open source licenses. The copyright information and a link to detailed information is displayed. - The Serial Number of the hardware that the software runs on.
- To view detailed copyright information, an internet connection is needed.
- Information on Software and Hardware is displayed:
Online Map
If needed, an online map can be used as background image in map view. You can choose between:
- None
- WMS (Web Map Services)
Using WMS
☞ Web Map Services provide subscription-free online map data. Several services are available.
☞ Requirements:
- Internet connection is established.
- A coordinate system is loaded to the active project.
- Measured or imported data are loaded to the active project or the software is connected to an instrument.
- Go to Settings > System from within the Home screen/Admin Panel.

- Select Online Map.

The Select Type page is displayed. - Select WMS.
- Enter the Url of the map service to be used or copy & paste it.

- For the sample screenshots used in this workflow description, we use the web map service of the Federal Geoportal of Switzerland.

- For the sample screenshots used in this workflow description, we use the web map service of the Federal Geoportal of Switzerland.
- Depending on the requirements of the selected map service, optionally enter your Username and Password and/or an activation Key.

- Switch to Low resolution, if necessary.
- Tap on Get Layers, in order to select the web map layers to be loaded to the iCON software.
- If no layers are selected Get Layers shows 'None'.
- If layers are selected Get Layers shows 'Selected'

- The web map layers are grouped and displayed alphabetically.
- To select layers tap on
 , to open the folders. Select specific layers by tapping them.
 - Tap Filter layers and enter a filter criterion, in order to get layers that fulfil the filter criterion grouped and offered for selection.

- Filtered Layers are grouped under 'Filtered Layers'. Selected layers are grouped under 'Selected'.
- To deselect layers tap them again.
- Tap
 to confirm and load the selected layers to the iCON software.
 - Then tap to activate the online map and return to the map view.

- The web map gets displayed as a background image in the map view.
- To turn off the online map, set Type to 'None'. See screenshot above under step 2.
List of Available Free Online Map Sources
NY Background map. 4band 3inch
State plane coordinate system
URL: orthos.its.ny.gov/arcgis/services/wms/Latest/MapServer/WMSServer?request=GetCapabilities&service=WMS
CT Background map. 4band 3inch
State plane coordinate system
Backup
- Go to Settings > System from within the Home screen/Admin Panel and tap Backup.

- To exit the screen, tap
 .
.
- To exit the screen, tap
There are two options for creating backup files of all data and settings in the iCON software.
Automatic Backup
If automatic backup is enabled, the software generates a backup file each time the iCON software is exited. By default, automatic backup is "On".
Automatically generated backup files can either be stored to the internal memory or to a USB flash drive. For automatic backup, maximum five backup files can be kept. Once a newer backup file is generated on top of these existing five, the oldest backup file is deleted automatically.
- Go to Settings > System from within the Home screen/Admin Panel and tap Backup.
- To change the setting for automatic backup, set Automatic Backup
to On or Off.- To reset to default settings, tap
 .
. - Tap
 to confirm the settings.
- To reset to default settings, tap
Manual Backup
A backup file can be generated manually at any time.
Manually generated backup files can be stored either to the internal memory or to a USB stick. For manual backup, the number of files that can be stored depends on the available memory size of internal memory or USB stick.
☞ If necessary, insert a USB stick into the controller.
- Go to Settings > System from within the Home screen/Admin Panel and tap Backup.
- To select the file location for the manually generated backup file, tap the arrow button
 .
.
- Choose between internal memory or USB stick.
- To start the manual backup process, select Manual Backup and tap .
- In order to store all data and settings to the backup file, the iCON software must restart. Confirm the message.
Restore
- Go to Settings > System from within the Home screen/Admin Panel and tap Restore.

- All existing backup files are listed. An icon indicates the backup option used and the file location of the backup file. See below for further information.
- Data, Device profiles and Settings can be restored separately. Tap the button to exclude one or the other from being restored.
- The button turns "black" and the components it indicates will not be restored.
- Tap the name of the desired backup file.
The file name is highlighted yellow. - To start the restore process, tap
 .
. - To restore all data and settings of a backup file, the iCON software must restart.
- Confirm the message.
- To delete a backup file, tap the
 button to the right of the respective file.
| Icon | Backup option used | File location |
 |
Automatic | Internal memory |
 |
Manual | Internal memory |
 |
Automatic | USB stick |
 |
Manual | USB stick |
User Permissions
The software allows for a user-configurable content. These settings can be password protected.
- To configure the User Permissions settings, go to Settings > System from within the Home screen/Admin Panel.
- Select User Permissions.

The User Permissions screen is displayed.- Switch Password Protection on and off. When switching the protection on, enter a password and confirm that password.
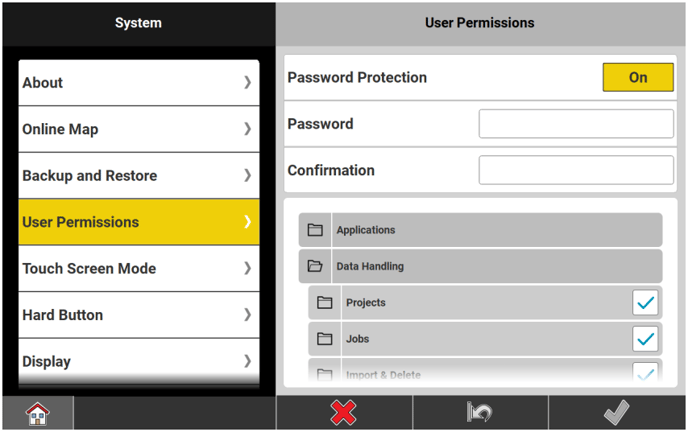
- To change user permissions or rather the content to be displayed and features to be available for use, tap
 to expand to the full extend for Applications or Data Handling or Settings.
- To change user permissions or rather the content to be displayed and features to be available for use, tap
- Now simply tap the checkbox
 for each application/optional licence or feature to be displayed on or off.
Selection is possible for:- All Applications/optional licences installed and activated by licence.
- For each application/optional licence single tools/functions can be switched on or off separately.
- The Data Handling features:
- Projects
- Jobs
- Import & Delete
- Export
- Reports
- View Container
Only those View Options that are available with your licence are available here for configuration.
Refer to:
Availability of View Options for iCON site
Availability of View Options for iCON build - Stake List Management
- Layer Manager
- Edit Control Point
- The Settings for:
- Online Map
Refer to:- Tools/Functions independent of app for iCON site
- Tools/Functions independent of app for iCON build
- Software Update
- Units
- Clouds
- TPS Settings, including Laser Setting, Compensator, Formwork Deck Mode, Standard Deviation, Instrument Settings in Anywhere Setups and Prism Type
- Localization from File
- Sensor Profiles
- Online Map
- To save changes, tap
 .
.
- All Applications/optional licences installed and activated by licence.
Touch Screen Mode
- Go to Settings > System from within the Home screen/Admin Panel.
- Tap Touch Screen Mode.
- Tap the row Touch Screen Mode to define the operation mode. Tap an item in the list to select it.
- Touch or pen operation.
- Touch operation in wet conditions. Pen is disabled.
- Touch or pen operation or touch operation with gloves.
- Tap
 to save changes.
 - If the Hard Button setting is configured accordingly, you can also toggle the touch screen mode with the Rotation button on the controller. Refer to Hard Button.
- Only available on the controller, not onboard TPS.
Hibernate Mode
- On the controller, press the Power button for 2 seconds.

- The controller switches to Hibernate mode. Drain of battery power is reduced to a minimum.
- To resume work press the power button again.
- If battery was low when the hibernate mode was entered, the controller will stay in hibernate mode when work is resumed.
Change the battery.
Else work will be resumed in the state that the iCON software had been in just before the hibernate mode got activated. - If the controller was connected to a TPS or a GNSS instrument beforehand, it will reconnect automatically to the device.
- If battery was low when the hibernate mode was entered, the controller will stay in hibernate mode when work is resumed.
Hard Button
Jump To:
CC70/CC80 Controller
CC170 Controller
CC180 Controller
CC200 Controller
Hard Button configuration on the CC70/CC80 controller
☞ When using the iCON software on the CC70/CC80 controller, it is possible to configure the functions of the Rotation button.

- From within the Home screen/Admin Panel, go to Settings > System and select Hard Button.
Following screen is displayed:
- The Measure function is always assigned to the Button A.
- Tap the row Rotation button to assign one of the following functions to the button:
- Switch Touch Screen Mode
- Snipping tool
- Camera
- Store on demand
- Start/Stop Line
- Screen Recording
- See also: How to use screen recording
- Point ID
- Codes
- Measure
- Windows button
- None
- Tap
 to save changes.
Hard Button configuration on the CC170 controller
☞ When using the iCON software on the CC170 controller, it is possible to configure the functions of the following buttons:

- From within the Home screen/Admin Panel, go to Settings > System and select Hard Button.
Following screen is displayed:
- The Measure function is always assigned to the Button B1.
- Tap the row Button B2 to assign one of the following functions to the button:
- Switch Touch Screen Mode
- Snipping tool
- Camera
- Store on demand
- Start/Stop Line
- Screen Recording
- See also: How to use screen recording
- Point ID
- Codes
- Measure
- Windows button
- None
- Tap to save changes.
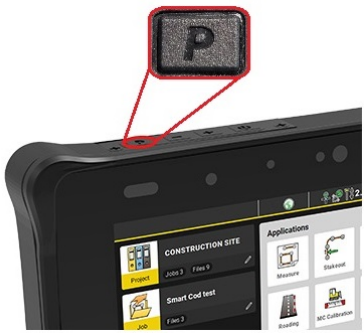
Hard Button configuration on the CC180 controller
☞ When using the iCON software on the CC180 controller, it is possible to configure the functions of the following button:
- From within the Home screen/Admin Panel, go to Settings > System and select Hard Button.
Following screen is displayed:
- By default, the Measure function is assigned to the PButton. Pressing the P-Button once while the iCON software is running, triggers a measurement.
- Tap the row Double tap P-Button to assign one of the following functions to the button:
- Switch Touch Screen Mode
- Snipping tool
- Camera
- Store on demand
- Start/Stop Line
- Screen Recording
- See also: How to use screen recording
- Point ID
- Codes
- Measure
- None
- Tap to save changes.
Hard Button configuration on the CC200 controller
☞ When using the iCON software on the CC200 controller, it is possible to configure the functions of the following buttons:

A1 - configurable by default set to 'Switch Touch Mode'
A2 - configurable by default set to 'Camera'
A3 - not configurable always set to 'Measure'
- From within the Home screen/Admin Panel, go to Settings > System and select Hard Button.
Following screen is displayed:
- The Measure function is always assigned to button A3.
- Tap the row Button A1 or Button A2 to assign one of the following functions to the buttons:
- Switch Touch Screen Mode
- Snipping tool
- Camera
- Store on demand
- Start/Stop Line
- Screen Recording
See also: How to use screen recording - Point ID
- Codes
- Measure
- None
- Tap to save changes.
How to use screen recording
- Configure the necessary hard button as described in: Hard Button
- Press the button to start recording.
- To stop recording press the button for 2 seconds.
A message is displayed.
- Tap Stop Recording to stop recording and save the file to the desktop.
- Tap and activate the Keep this recording on the desktop checkbox, if you want to keep the file. The file will be indexed so that it does not get overwirtten when the next recording is started.
- Tap Cancel to continue recording.
- If you exit the iCON software while a recording is running, the recording is stopped and saved automatically. The last saved file will be overwritten.
Necessary driver for screen recording
If necessary download and install the driver for screen recording (CCxx-MKxComponent_screenRecording.exe) from myWorld under the relevant section for your controller.
For controllers delivered with v5.0 or higher, the necessary driver is already installed.
☞ Before installing the driver, make sure that iCON is not running.
Screen lock configuration
☞ Only available for the 5" controller onboard TPS.
The screen of the 5" controller can be locked. Define a PIN to unlock the screen.
- To configure the PIN, go to Settings > System from within the Home screen/Admin Panel.

- Then select Screen Lock.
- In the Screen Lock screen enter a PIN. Set Use PIN to On.

- To change a PIN:
Set Change PIN to On.
Enter a new PIN.
- Tap to save changes.
Display
- To configure the date and time settings and basic display settings, go to Settings > System from within the Home screen/Admin Panel and select Display.

Following screen is displayed:
| Element | Options | Description |
| Time format | 24 Hours, 12 Hours | Selected format is adopted throughout the application. |
| Date format | DD.MM.YYYY, MM.DD.YYYY, YYYY.MM.DD |
Selected format is adopted throughout the application |
| Coordinate Order | E, N, H N, E, H |
Selected format is adopted throughout the application. |
| Display Accuracy | Simple, Standard, Precise |
Defines the decimal place: ☞ If angle unit is set to Deg Min Sec angle precision is: 0.1" Selected format is adopted throughout the application. |
| Map Background Color | White, Default, Grey, Dark Grey | Allows for adapting the background colour of the map view. |
| Info Flash | On, Off | When set to On, a confirmation flashes over the Information bar for certain processes, for example when storing a point. |
| Map Preview on Layer Manager | On, Off | When set to On, the map preview is enabled in Map View manager. Refer to Map View manager. |
| Information preview for points | On, Off | When set to On, a preview window pops up showing the values to be stored for the currently measured point, for example Point ID, coordinates, assigned code and attributes. Refer to Information Preview for Points. |
| Classic Home Screen | On, Off |
When set to On, the iCON software starts up with showing the Home screen. When Off, iCON starts up with showing the Map screen and Home screen functionality being available from the Admin Panel. iCON site: by default On ☞ The setting is kept when shutting the iCON software down. ☞ If you have got an 'iCON site Excavator' licence, you can optionally switch the display to portrait mode on the CC200 controller In portrait mode only the classic Home screen is available. |
Sound Notification
- To configure the date and time settings and basic display settings, go to Settings > System from within the Home screen/Admin Panel.
- Select Sound.

- In the Sound Settings screen:
- Switch sound on and off.
- Select Sound Volume level from Low, Mid, or High.
- For On Storing, TPS prism lost, and GPS fix lost select sound file for notification.
- Tap
 to listen to the relevant demo sound.
- Tap to save changes.
Active Licences
Before installing any firmware updates check the maintenance status.
The iCON software conducts a maintenance check before any update installation.
- Go to Settings > System from within the Home screen/Admin Panel.
- Select Active Licences.
- Reach out to ABTech for information about maintenance renewal.
Add Licences
The iCON software offers some optional licences, that can be acquired and activated separately based on the available iCON site/iCON build licence.
☞ For details on the available licences for iCON site and iCON build, refer to Licencing and/or reach out to ABTech for further information about licencing.
☞ For details on the available optional licences, refer to:
Availability of Optional Licences for iCON site
Availability of Optional Licences for iCON build
A list of all optional licences can also be found in the Equipment Lists on myWorld.
Activating licenses protected by an entitlement
Licenses that are protected by an entitlement can be activated on the controller or on an instrument with a display unit by tapping System and then Add Licences.
Enter the entitlement received from your representative and tap ![]() .
.
To update an entitlement tap ![]() the button that can be found in the Function bar at the bottom of the screen.
the button that can be found in the Function bar at the bottom of the screen.
☞ An internet connection is needed to activate an entitlement
Activating licenses protected by a license key 
Some features are protected by license keys that need to be uploaded to the instrument from an SD card or a USB flash drive.
- On TPS with display, license upload can be handled directly on the TPS
instrument. - For TPS without display, license upload has to be steered via the controller.
Below short instructions on uploading licenses using the controller are given.
☞ For further information ask your sales rep or reach out to ABTech here.
- Insert the memory device into the instrument and turn the instrument on. Make sure that the instrument is properly connected to the controller.
- Tap Devices, then tap on
 next to the instrument name to edit its profile.
 - Tap Sensor Utilities, then tap Upload licence key in the Sensor Utilities screen.
- Select the license *.key file to be uploaded and tap the Start Upload button.
Software Update
It is possible to download software/firmware updates for the following devices:
- iCON field software
- iCON iCG30, Measurement Engine firmware only
- iCON iCG60
- iCON iCG160
- iCON iCG70
- iCON iCG100
- CR50
- iCON iCR70/iCON iCR80/iCON iCR80S
- iCON iCT30
- iCON iCB50/iCON iCB70
- When the controller is connected to the internet and a new iCON software version is available, a notification message is shown. The new iCON version can be downloaded from Settings > System > Software Update.
- An orange dot on the System Settings button in the Home screen/Settings button in the Admin Panel indicates that a new software version is available for download.

- An orange dot on the System Settings button in the Home screen/Settings button in the Admin Panel indicates that a new software version is available for download.
- Go to Settings > System > Software Update.

- The new installation/firmware files can be stored to the Internal memory/System or to an external memory device (for example, USB).
- Tap Destination > To and select the file destination. Select between Internal memory and Removable Disk.

- Information is displayed on where downloaded files are automatically stored to on the selected storage device and the correct path is selected automatically.
- Back in the Software Update page, tap the buttons
 to start downloads.
- When a new firmware version for a device is available, an orange indicator appears on the download icon.


- Several downloads can be started simultaneously. The path of the file that is currently being stored is displayed for information (read-only).
- It is possible to operate the software as usual while download is running. Once download is finished, a notification message appears in the Map View.
- Downloaded files can be transferred to GNSS antennas or Total Stations to upgrade these devices.
- When a new firmware version for a device is available, an orange indicator appears on the download icon.
Language
☞ Numerous languages are available to run the software with.
- To set a specific language, go to Settings > System from within the Home screen/Admin Panel.
- Select Language.

- Tap on the flag for the desired language.
- Tap to save changes.